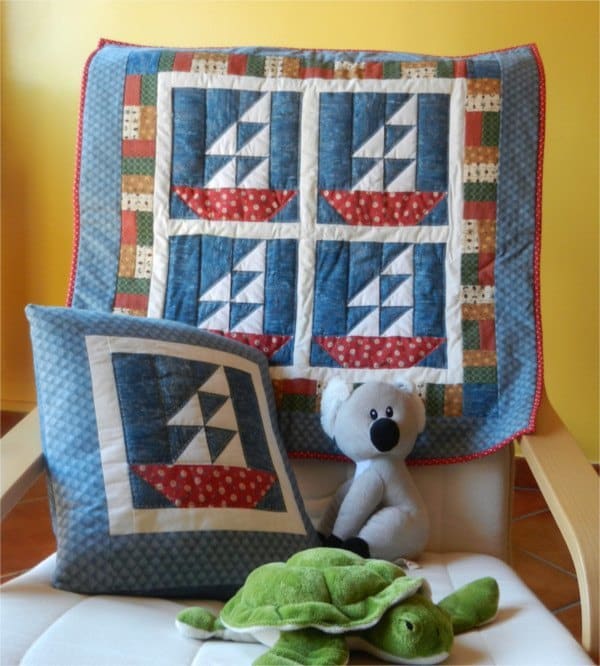
Sailboats are perfect for embellishing the children's room or if you want to think big, you could make them into a quilt to put on your sofa. The technique we propose to make the triangles is super easy and quick to do. Composition of a quilt The quilt consists of a top part, patchwork or top, an inner part, batting, formed by the batting and a back part, the backing. Once the quilt is made, stitching or quilting is done on the patchwork, which is intended to hold the three layers (fabric and batting) together and reinforce the seams, as well as to embellish it with various designs. Each finished section of patchwork is called a block. The ironing done each time you sew one piece joined to another is important. Caution. Ihe margin for stitching should always be 6 millimeters, and hems should be ironed together in the direction of the darker-colored fabric, unless otherwise specified. Accuracy of cutting, stitching and ironing are critical to the success of a good quilt.
Machine stitching
Each part of the patchwork should be sewn to another by overlapping the fabric straight and leaving a hem, with a distance from the machine needle to the edge of the fabric of 6 millimeters. So position the needle so that you have this measurement; a thin strip of tape affixed to the plate of the sewing machine and thus have a constant guide. Stop the beginning of the stitching with a forward and a backward stitch and set the stitch length selector to 2.5 as if you were doing a normal hemstitching. When sewing patchwork blocks together, one joined to the other, it will be helpful to stop them by using quilting pins.
The technique of quilting (stitching) Quilting should be done when the quilt is completed, but before adding the last reinforced border or binding. It can be done along or alongside the patchwork seams, following the design of each block. It achieves the effect of emphasizing the details of the patchwork and is best done by hand. The more experienced sewing machines can achieve the same effect by using stitch length slightly longer than for a hem. If you want to decorate the patchwork, especially the borders, with special embellishments, first carry the stencil design (the template) for quilting on the top with an erasable pencil and do the stitching on the pencil mark.
The stitching
It is very important to make stitches as small as possible and all the same length. This skill is acquired with lots of practice and the use of special needles (quilting needles) of gradually smaller size. To begin with, a #10 or 12 needle can be used. Usually a frame is used without overstretching the area over which you are to work. The purpose of the loom is to keep the three layers of the quilt even. Tip: If it is difficult for you to use the loom you can do without it for smaller quilts. Be careful, however, as you slide your hand under the quilt that the backing fabric is always tight and wrinkle-free.
Take a portion of yarn about 46 cm make a knot at the end. Start from the center of the work. Thread the needle from the wrong side in the direction of the top and lightly pull the thread until the knot passes the backing fabric and stops in the batting. The quilt should be perfect from both the right and reverse sides.
Insert the needle through the three layers by threading it through the top with the help of the thimble. When the needle reaches the other hand,which is to be held on the reverse side of the quilt, push it back toward the top to make another stitch. Repeat until you have 3 / 4stitches over the needle. (Fig. 1-2-3)
Once you have finished another work area or run out of thread,tie a small knot near the surface of the top by wrapping the thread around the needle 3 to 4 times and pulling the needle. Make a small backward stitch and pull the knot inside the quilt so that it remains hidden in the batting. Cut the thread at the height of the top.
Once the stitching is finished,cut the bottom two strips of fabric and padding to even them out at the top.
The use of the disc cutter * An acrylic ruler is used to hold the fabric to be cut in place to serve as a guide. To cut, you need to stand so that you have a better view of the fabric, the size of the cut, and for greater control of the cutter. As you become more experienced, you will be able to cut several layers of fabric at once. *Keep away from children and people inexperienced in using it.
The block with the sailboat Cut fabric selvedge before starting Quick method for cutting 2 triangles together For this method, accuracy is key:
Cut from the fabric for the background and the fabric for the sails two 18×47 cm rectangles and overlap them making them fit perfectly.
Using a pencil and ruler, mark horizontal and perpendicular lines on the reverse side of the lighter-colored fabric, 7.5 cm apart, to make a grid. Now mark the diagonal of each square. (Fig. 4) These will be the cutting lines.
Mark on both sides of each diagonal a dotted line, or to distinguish it better use a red pencil, 6 mm away from the diagonal. These will be the seam lines.
Secure the 2 rectangles with pins and sew along all dotted or red lines.
Cut along the continuous lines,first the perpendicular ones, then the horizontal ones and then the diagonal ones, and you will get 24 A-sections of about 6.5 cm, composed of two triangles. (Fig. 5) Iron toward the darker fabric.
First cut off the excess points and check with a ruler that the sides of the sections are all equal and that the points of the triangles are perfectly symmetrical. It is better to redo a few seams than to find lopsided triangles! Tip: some adjusting can be done with the cutter or during ironing
Cut a 6.5-cm square from the sailcloth.
Cut a 6.5×11.5 cm strip from the fabric for the background.
Overlap the square on the bottom of the strip perfectly and mark the diagonal of the square with pencil. (Fig. 6)
Sew along the diagonal making sure to go exactly from corner to corner.
Iron the hems toward the darker-colored fabric and cut the bottom two layers to a 6 mm. You will get section B. (Fig. 7)
Cut 3 strips 6.5×16.5 cm from the background fabric. You will have section C.
Sew three A sections together, one A section to B and then the various sections together as in Fig. 8.
Cut a 6.5×21.5 cm strip from the boat fabric.
Cut from the fabric for the background 2 squares of 6.5 cm and overlap them perfectly,to the boat strip as in fig. 9.
Mark the diagonals and sew as you did before, then iron the hems toward the boat.
Sew this section to the sails (Fig. 10)
Carefully square the block, which should be about 21.5 cm square throughout.
Make 4 more equal boat blocks,in all you need 4 for the panel and one for the cushion.
The addition of panel borders
Cut from the fabric for the first border two strips 4 cm x the length of the block.
Sew it to the right side of the block and then the second block to the same strip.
Do the same with the other two blocks.
Cut three strips 4 cm x the length of the two blocks sewn together
Sew a strip to the base of the first two small boats and to the same strip then the other two small boats.
Sew the other two strips to the top and bottom sides of the four-boat block. Finish by sewing two more strips to the sides.
The addition of the border of 4 fabrics It might be fun to have a multicolored border, but if you prefer to simplify it, you can simply add a strip of contrasting color.
Cut two 4 x 64 cm strips from two different fabrics. Sew them together and iron toward the darker strip.
Cut these strips into 6.5 cm rectangles
Proceed in the same way with the other 2 fabrics.
Once you have all the rectangles,sew them to each other alternating the fabrics and the direction of the rectangles (one vertical and one horizontal). You need 9.1 / 2 rectangles for each edge. (Fig. 11)
Pin the first strip to the top side of the top and then sew. Do the same with the bottom side.
Cut 4 6.5 cm squares from the background fabric and sew them to the beginning and end of the other two strips. Sew to the sides of the top, then iron the edges outward.
Cut two 7.5 cm strips from the patterned checked fabric and sew them to the top and bottom sides. Then cut two strips for the side edges.
Panel completion
Cut from the fabric for the reverse side a piece slightly larger than your top
Cut the same size from the padding
Lay on the work surface first the reverse side,right side up, and on this put the padding and last the top,right side up.
Baste the three layers with long stitches,starting from the center toward the vertices and then in the direction of the sides.
Do the stitching following the instructions given. For this quilt, we recommend that you do the stitching very close to all block and border seams following the dotted lines in Fig. 10.
When finished, even out the backing and batting of the top, and check again that all sides are equal.
Addition of the reinforced outer edgeband
Cut two 7.5 cm strips from the boat fabric and double them by ironing them in half.
Overlap them, the open side towards the outside,to the top and bottom of the panel, tack pins and then sew. Cut two more strips for the sides. Sew and iron outward.
Fold the border back in the direction of the reverse side, and then finish sewing by hand with hidden stitches.
There, your panel is ready! Now all you have to do is sew two curtain rings on the reverse side and hang it up!
The pillow
Once the small boat block is completed with the first border,cut two strips 7.5 x the length of the entire block from the border fabric and sew them to the top and bottom.
Cut and sew two more strips to the sides and iron the hem outward,
Cut from the fabric used for the reverse side of the panel a piece slightly larger than the top, place over the padding and eventually the top keeping the right side in your direction.
Do the stitching as done for the panel
Cut a 24 x 38 cm rectangle and a 21.5 x 38 cm rectangle from the border fabric.
Machine a hem to one of the longer sides of both rectangles
Pin using pins the largest panel to the pillow.
Now pin the other panel to the other side of the pillow, and then sew all the way around.
Cut over the corners, turn over, insert the stuffing, and the pillow is finally ready!
Outline in pdf to download boats-a-sail-quilt Needed Metrage calculated on 110cm high cottons 100 cm of white cottons for sails and reverse of quilt 100 cm of blue patterned cottons for background and reverse of pillow 30 cm of red patterned cottons for boats and outer border 20 cm of contrasting patterned cottons for 1st inner border 20 cm of 4 cottons for 2nd border 50 cm of checked cottons for outer border Quilt batting Accessories Disc cutter Anti-cutting base Ruler(s) Stitching frame (opz) Hand quilting ecru thread (opz) Hand quilting needles (opz) Sewing machine