
No products in the cart.
Learning to adjust your sewing machine's tension allows you to achieve perfect stitches on any material and with any type of thread; it also enables you to fully utilize special sewing techniques and enjoy rewarding results in creative sewing projects.
La tensione inferiore o della spola poi è ancora più difficile da capire e regolare della tensione superiore di qualsiasi macchina da cucire in quanto non si hanno punti di riferimento come numeri o altro ma solo una vite molto piccola che permette la regolazione.
As repeatedly emphasized—including in the post where we discussed upper tension adjustment—the most important thing before touching the sewing machine tension settings is to be absolutely certain that everything is done according to the manufacturer's instructions for your specific machine.
Generally speaking, for machines with a removable metal bobbin case, the bobbin should be inserted so that it rotates clockwise when the thread is pulled; conversely, for top-loading bobbin machines, it should rotate counter-clockwise. However, always refer to the manufacturer's instruction manual.
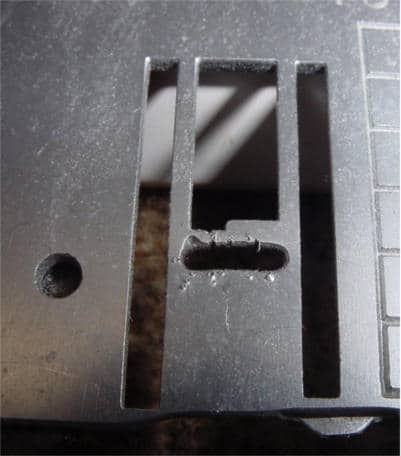
Before adjusting the tension, check that the bobbin case is not damaged. In cases like the one shown in the photo, it must be replaced.

If the sewing machine to be adjusted has a bobbin case made of plastic (ABS) rather than metal, remove it from its housing and check the surface for scratches, burrs, scoring, or even holes; otherwise, the adjustment process will be futile.
If you notice any roughness, get some very fine-grit sandpaper (800–1000 grit) and polish the damaged area to perfection so that it is completely smooth and the line cannot snag in the slightest.
Check the needle plate in the same way; if you notice scratches in the slot where the threads emerge, remove the plate and use emery cloth to smooth away any rough spots.
To be absolutely certain you haven't overlooked anything, replace the needle with a brand-new one and proceed. Another factor that could prevent you from adjusting the tension is dirt or thread fragments accumulating under the bobbin tension spring, stopping it from functioning correctly.
Provate stringendo di un giro la vite di regolazione e se notate un deciso aumento della tensione del filo (provate tirando il filo) allora non dovrebbero esserci residui ed è consigliabile rimettere la vite nella posizione di partenza, se invece non notate alcun indurimento nello scorrere del filo allora sicuramente c’è dello sporco da eliminare.
Potete provare con un uno spillo passandolo sotto la molla di tensione della bobina della macchina o potete usare il trucco del cordoncino con i nodi descritto nel post precedente, sperando che riesca ad agganciare e a far fuoriuscire i residui, spesso però è necessario smontare la molla e pulire manualmente la parte.
We recommend taking photos before proceeding, so you can check how the tension spring was installed in case you forget after removing it.
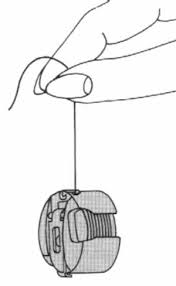
If you have disassembled and reassembled the spring, you no longer have a reference point for the tension. The recommendation is to insert the bobbin holder and adjust it so that, while holding the thread between two fingers, the holder itself does not fall; however, if you give it a slight tug, the thread should feed out in a jerky, step-by-step motion.
Once you have done this, try sewing again without changing the tension settings; if the stitching remains imprecise, you will need to adjust the tension.
Assuming the upper tension is correctly set, we then need to address the lower tension. A good way to check the tensions is to thread the machine with two threads of the same quality but in different colors, and then sew a seam for about 20 cm on a piece of cotton fabric folded in two.
Check the stitching on both sides; ideally, the knot formed by the two threads should look exactly the same on both the right side and the wrong side of the fabric.
If the issue is more noticeable on the underside of the fabric—and assuming the upper tension is correctly adjusted—then we need to slightly loosen the lower (or bobbin) tension.
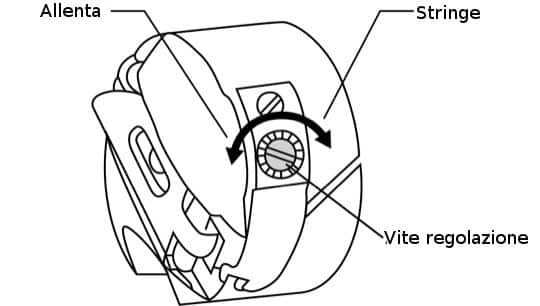
If you have a sewing machine with a vertical bobbin that pulls out towards you, you will find one or two screws located on the tension spring. If your model has two screws, the one to adjust is the screw normally positioned in the middle of the spring.
Simply unscrew it (turning counter-clockwise) just a tiny bit—less than a quarter turn—and try sewing again, continuing until you find the right tension.
If, however, the problem appears on the upper side—with overly prominent knots and perhaps even slight fabric puckering—you need to tighten the screw, making only very small adjustments at a time, to increase tension on the lower thread and thereby balance the stitch.
The tension for zigzag stitching.
The tension for the zigzag stitch can be left the same as for the straight stitch, although ideally, it would be slightly higher and the speed slightly slower than normal.
In un punto zigzag equilibrato, i fili dovrebbero incontrarsi a metà strada tra i due strati di tessuto in ogni angolo del punto, senza passaggi sulla parte superiore o inferiore della cucitura e senza grinze nel tessuto.
Lightweight fabrics are particularly prone to wrinkling when zigzag stitch is used. Adjusting stitch width and length and adjusting tension can help to eliminate unwanted wrinkles.
Specific adjustments for Decorative Stitches
There are cases where unbalanced tension is preferable—for example, when sewing decorative stitches, buttonholes, and generally all satin stitches (scallop stitches, etc.).
The tension on the top thread should be slightly lower than that of the bobbin thread. This will give the stitch a more rounded appearance and ensure that no bobbin thread is visible on the top side of the work.
Some machines have an “eye” on the bobbin case that the thread can be threaded through to add a little tension to the bobbin thread, eliminating the need to adjust the upper tension.
Sometimes you may want to use a special thread in the bobbin for decorative stitching or embroidery. Depending on the thread thickness, you might need to adjust the tension—or, ideally, if the bobbin case has one, thread the bobbin thread through the eyelet on the case itself.
Winding a sewing machine bobbin correctly is a simple task that helps prevent imperfect stitching. This brief guide outlines the key steps and offers a few handy tips.
Place the wire and spool retainer on the pin. For thinner spools of thread, place the spool retainer with the smaller end next to the thread or if available use a small spool retainer so that the spool does not turn on itself but the thread unwinds without spinning the spool.
Insert the wire into the guide(s) so that it cannot jump out and tangle.
Wrap the wire clockwise around the tension discs of the wire feeder.
Insert the end of the thread through one of the top holes in the spool as shown or wind it a few turns clockwise by hand and place the empty spool on the spinning wheel pin.
Slide the bobbin placed on the bobbin winder spindle to the right and fill it, taking care that the thread does not wind around the sewing machine's bobbin winder shaft.
We always recommend noting down the standard settings—identifying a reference point so they can be restored later—and sewing a test sample before altering the adjustments.
Some creative sewing and specialty embroidery projects involve using very thick decorative threads in the bobbin. In this case, the bobbin tension will need to be adjusted to loosen it.
We recommend purchasing an additional bobbin case—adjusted and used exclusively for thick threads—rather than constantly adjusting the screw between this type of sewing and standard stitching.
Excessive adjustments wear out the threading, and the tension adjustment may no longer function correctly. If the capsule is not removable, the tension spring can be bypassed entirely.
Always consult your sewing machine manual. We hope this guide helps you optimally adjust your sewing machine's tension settings, and we welcome any additions or suggestions.


